20080928

Ubuntu Photo Frame


About two years ago I converted an old laptop into a photo frame for the living room. There are plenty of examples of how to do this floating around on the web these days, so I am not going to cover that here. What I am going to talk about are the software aspects of this project, and my recent upgrade of my photo frame.

The frame had been working fine for almost two years, but a few months ago I upgraded my WiFi network at the house to WPA (finally), but that meant that I could no longer transfer files to the frame because the WiFi card I was using in it only supported WEP. Shortly after that, the frame started acting strangely, turning itself off about once a day, then finally not booting at all with the infamous “missing file” messages you get when Windows can't read the hard drive correctly.

The original software setup for this project was Windows 2000 with a small .NET application I wrote to scan a directory and display pictures from it. When it was time to display the next photo, the program would scan the directory and pick a new picture at random to display. The laptop hardware did not have enough “horsepower” to handle any kind of transitions or fades between photos, so the program just displayed the next photo on the screen without any transitions.

I brought the frame back to my cave, where I confirmed that the hard drive had indeed given out. I ordered a SYBA SY-IDE2CF-NB25 Ultra IDE to Compact Flash Adapter from StarSurplus, and with a 4GB Compact Flash card I had laying around, I now had a solid state hard drive for the frame. I also ordered a EDIMAX EW-7108PCg 802.11g/b Wireless LAN PC Card from NewEgg to allow WiFi access to the frame again. I selected this card because it is well supported under Linux and it is very inexpensive. Now that I had all the hardware ready, time to re-install the software.

I wanted to use Ubuntu for this project, because I am familiar with it, and this would give me an opportunity to learn about doing a very minimal installation. My goal was to use as little space on the flash drive as possible for the OS and supporting programs to leave room for photos. After a few practice runs setting up the system and trying different programs, I came up with the following recipe.

First, I installed Ubuntu Server, with the OpenSSH and Samba options. The server edition of Ubuntu doesn't install any kind of GUI (just a command prompt) and none of the heavy applications like OpenOffice, Evolution, etc. Then I got the Wifi card working (it wasn't detected during setup) and performed an upgrade to make sure I had the latest security patches. I setup Samba to allow access to the folder containing the pictures to be displayed. Next I apt-get installed xorg, dnotify, and feh. feh is a small, lightweight image display program for X. While playing around with different configurations, I discovered that even under Ubuntu, this laptop just didn't have what it takes to display transitions between photos, and so feh fit the bill almost perfectly.

I tweaked the xorg.conf file to prevent it from blanking the screen (I think it defaults to blank after 10 minutes), copied some photos to the frame, and fired off feh using xinit. And my photo slide show started up! The only problem with feh is that it only reads the files in the directory when it starts up, so if I add pictures to the directory later, I would have to restart the program in order for them to be shown. So I created the following script using dnotify to restart the program whenever any files in the folder have changed.


#!/bin/bash
export HOME=/home/teknynja
while true; do
killall -q feh
sleep 1
xinit /usr/bin/feh -rzFZD180 --hide-pointer /home/teknynja/Pictures &
dnotify -MCDRro /home/teknynja/Pictures
done

I made the script executable, and added a line to invoke the script from inside /etc/rc.local so that it would run when the system started up. After a couple of days of testing in the cave, I put everything back together and it is now back in the living room, displaying our family photos once again. It also has the added bonus of being completely silent, due to the solid state hard drive. The total space budget on the flash drive was 645MB for the OS and supporting programs, leaving around 3GB for photos, which is more than enough for now.

Once again I warn the readers that I still have a lot to learn about Linux, so any constructive comments are appreciated. If you have any questions or would like more details about this project, feel free to leave a comment and I will try to help you if I can.

Read More......

20080908

Obscure Ubuntu Tip: CRON User account has expired

No, I haven't forgotten that I have a blog. I've just been keeping busy with a lot going on at work, and a backlog of “projects” at home after finishing up the kitchen project. Some of those projects have involved getting down-and-dirty with Ubuntu, and I thought I would share a quick tip I discovered yesterday.

I was looking through the system log (/var/log/syslog) on one of my servers and I noticed it was full of “CRON[xxxx]: User account has expired” messages. A little searching on the web pointed to the fact that the root account had been locked. While setting up this server, I had followed some instructions I found on the web that required me to unlock the root account, then re-lock it when I was done with the

sudo passwd -l root
command. Locking an account this way also causes the password to be expired, one of the results of which is the above mentioned log entries. Most of the solutions I found on the web involved either unlocking the root again and giving it a long, random password, or manually editing the password files. I think I've found the correct way to fix this though, by using the
sudo chage -E-1 root
command, which sets the root's password to never expire. (Note that the -1 is negative one, not dash L). After using the above command, the system log showed normal CRON log entries, and the root account remained locked.

I hope someone else will find this information to be of use. That's it for my very obscure Ubuntu tip. Join me again soon for another exciting post. I actually have a good sized list of topics to cover on the blog, so hopefully things will settle down and you will hear more from me soon. Thanks for stopping by!

Read More......

20080629

Picture Perfect


This past Father's Day I received a shocking but pleasant surprise – a shiny new Canon SD870IS ELPH point and shoot camera! The shocking part was due to the fact that my wife never buys technology for me, because I am so picky about my gadgets. The pleasant part is because I've been looking to replace our old SD200 that we've had for years. We both loved that camera because of it's small size, ease of use, and fast response time (when you have two fast-moving little ones, it helps to have a camera that can capture an photo right when you press the shutter release). We've also shot hours of video with the SD200, because even though we have a nice Sony camcorder, we never feel like lugging it around with us. The video quality is more than acceptable and it allows us to capture moments we would never have been able to with something larger. The SD200's 3.2 mega-pixel sensor worked fine for the kinds of shots we take.

So enter the SD870IS. The coolest feature about this camera is the “IS” at the end – Image Stabilization. For normal shooting it helps eliminate blur and even works on the large, bright 3” screen. (I was always jealous of other camera's big screens when all I had was the SD200's 2.5” screen). But the stabilization really comes in handy for shooting video. With such a small device, shaking is always a problem on video. The old camera's video always had a lot of shake and could be annoying to watch sometimes, but this new camera shoots nice, steady video that is wonderful to watch! And for photos, the 8 mega-pixel sensor allows us do more with printing and cropping than we could ever do before.

Over the years since the SD200 was introduced, Canon has added tons of cool little features to the software, too numerous to mention here, but several new shooting modes, and auto adjusting the image orientation while reviewing images are a couple of them that I really appreciate. The SD870IS still has some of the same issues as it's older cousin, most notably it's mediocre low light performance But overall, I am excited to have this cool new toy to play with, and I'm no longer lusting over the other cameras I see when we take the kids to Disneyland! Thanks Honey!

Read More......

20080617

Video Sedation


During one of Woot's last “Woot-Offs”, I picked up a couple of Sansa E250 media players for the kids to watch videos on when we need them to be calm and quite (like during visits to Ikea). They each already have a Sansa Shaker loaded with their favorite songs (Tucker seems very fond of his blue “radio”), but video is a much more effective way to keep them “sedated”. In the past, I used my T-Mobile MDA with several hours of their favorite movies loaded on it to keep them occupied – but they both had to share the screen and I didn't like the idea of them fondling my phone and possibly dropping or otherwise injuring it.

For $30 bucks each during the woot-off, I figured I couldn't go wrong, so I ordered two of them. I quickly discovered that the built-in firmware for these players could only handle video encoded using Apple Quicktime DLLs that I have so far managed to keep off my system. Plus, the compression of the supported format was so bad that I could have only put a few minutes of video in the limited 2Gb of memory the devices contain.


Here's were Rockbox saves the day. Before I pressed the shiny “I Want One” button on Woot, I did a little research and discovered this project and found it supports the players I was about to purchase. I went ahead an placed my order for two, then within hours of their arrival, I had the Rockbox firmware installed on them. I played with the software, tweaking the many settings and options the firmware provides.

Finally it was time to put some videos on the devices. It took a while to figure out the optimal encoding options for these devices, but after playing around for a few hours I arrived at the following settings:


Video Encoding Format MPEG2 (RockBox only supports this for now)
Video Resolution 224x176
Video Bitrate 192 kbps
Video Frame Rate 25 fps
Audio Encoding Format MPEG-1 Layer 2
Audio Samping Rate 44100 Hz (other samping rates break mpeg 2 compatibility)
Audio Bitrate 64 kb/s, Monophonic


Although this results in some serious visual artifacts, this is perfectly fine for the kids to watch (they haven't complained yet!). These settings allow me to cram several hours of video onto the players. The only thing I haven't figured out yet is how long the batteries last during video playback – the longest stretch of time the kids have watched the devices is about 90 minutes during a drive back from Grandma's House.

I figured I should share this little tip in case anyone else needs to administer some “video sedation” of their own while out in the world. As always, any tips and suggestions are always appreciated in the comments.

Read More......

Kitchen Mod Update


Sorry I haven't been posting in a while, but once I got started on the kitchen, every free moment after work was devoted to it. I finally finished all the tough stuff last week, all that's left to do is convert a can light in the ceiling to a hanging lamp that Kelly picked out at Ikea (where else?) The granite people came out last week and attached the sub-tops and made templates, but we are still waiting for them to contact us so we can choose the layout. But even with just the sub-tops (read plywood), life with an island in the kitchen is much better. You can see more details on our kitchen project on Kelly's blog at IkeaFans. It isn't up to date with the latest pics yet, but you can get an idea of what I've been up to the last few weeks.

Read More......

20080502

Vintage TV Mod, Part III

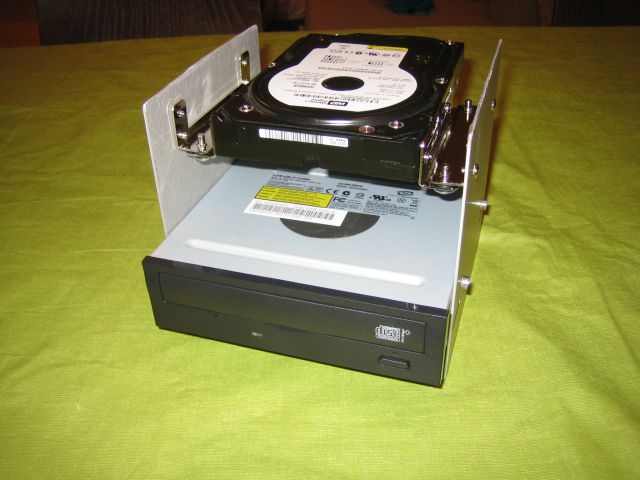
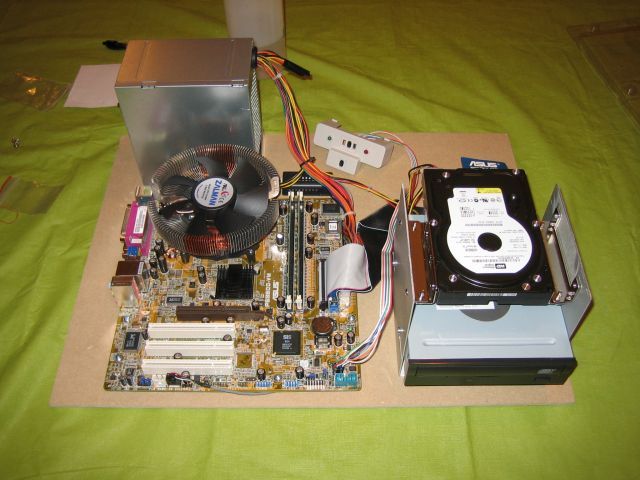
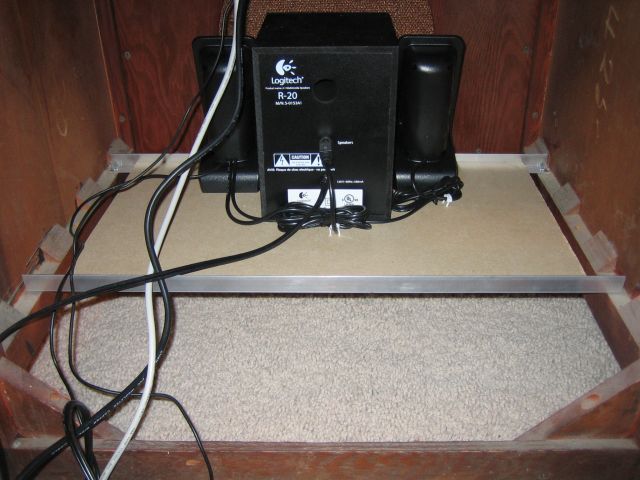
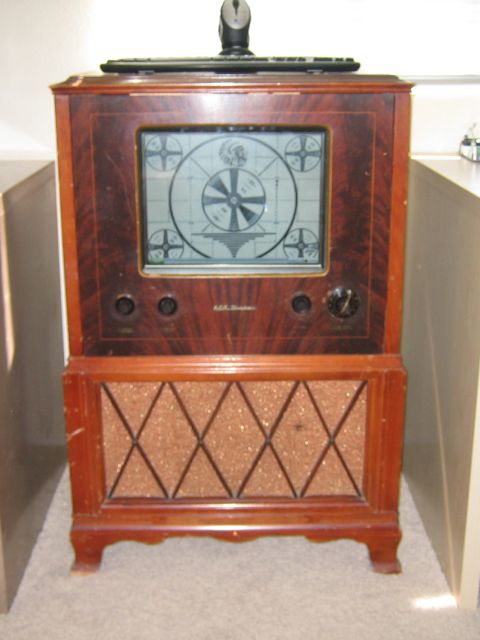
Last time, I mounted the LCD display to the front panel and got a pretty good looking test out of it. Now it's time to put the computer electronics and knobs on this thing. First up, I built up a bracket to hold the hard disc and CD-ROM drive. This arrangement turned out to be nice and stable, and allowed me to use a vibration dampening 3.5” to 5.25” drive adapter kit to help keep the hard drive quite. I then mounted the drive cage, mother board, and power supply to a piece of 1/4” MDF that I had pre-cut to fit inside the cabinet where the old chassis used to be, making sure to leave room for the LCD monitor. I used a large, quite Zalman CPU fan to keep noise to a minimum. Once everything was mounted to the sub-panel, I placed it inside the cabinet and screwed it down. Next, I built a small shelf for the bottom half of the cabinet where the speakers would sit. A couple of lengths of aluminum L channel span the width of the cabinet, and a small piece of MDF forms the shelf. I purchased a cheap 2.1 Logitech speaker system, and screwed the speakers to the shelf, facing out through the old speaker grill. I put a piece of black electrical tape over the power lamp to keep it from showing through the grill cloth.

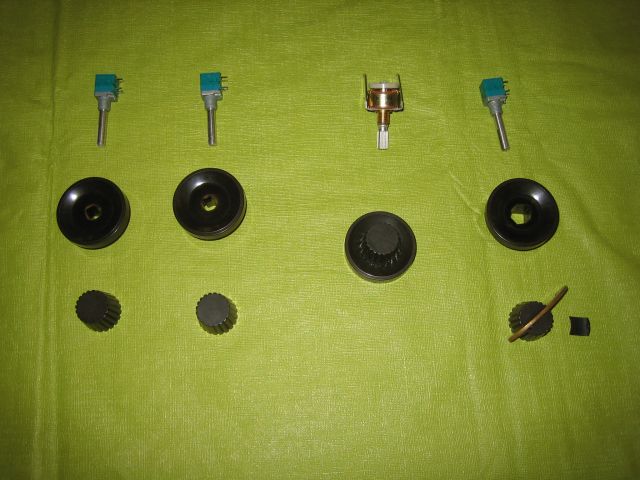
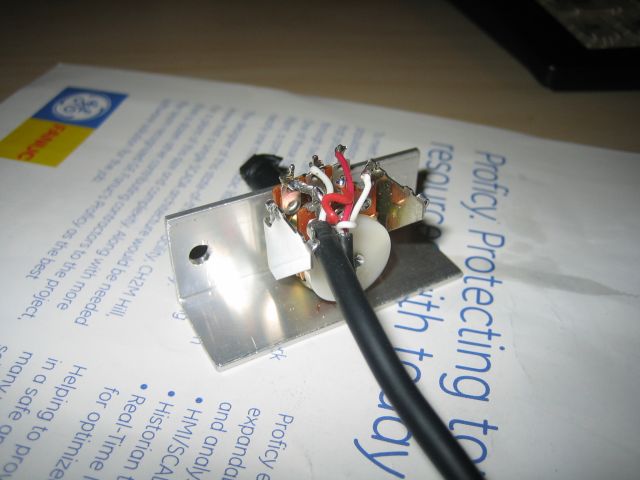
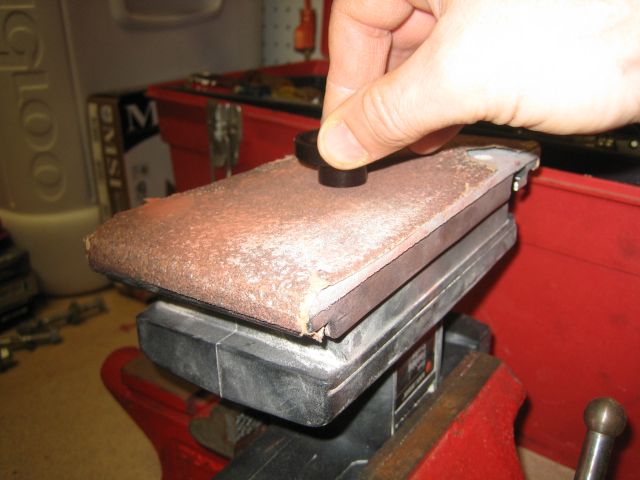
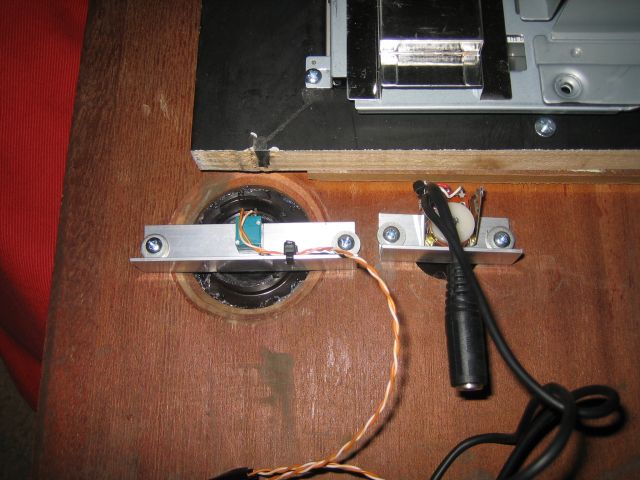
Next, I purchase some potentiometers from the ultra cool surplus store Electroncs Goldmine, three with a momentary push switch feature, and one dual potentiometer to be used as the volume control. Two of the potentiometers were just dummys to hold the knobs, although they could be used for something in the future. The remaining switch-pot was wired up to the power switch connections on the mother board, so I could turn the computer on and off by simply pressing the knob. The dual potentiometer was wired up as an attenuator with a standard stereo 3.5mm plug on one side, and a 3.5mm stereo jack on the other side. The plug then connected to the line out on the mother board, and the speakers plugged into the plug on the other end. Now I have a nice physical volume control, just like the original set! I had to grind off the back of the volume knob to get it to fit onto the short shaft of the audio pot, but the other shafts fit perfectly into the original knobs that came with the tv. I used short pieces of aluminum L channel to mount the pots to the front panel, then adjusted the depth of the shafts using the nuts to get the knobs just the right distance from the front panel.
Once I had all the mechanical aspects taken care of, I mounted a power strip to the under side of the chassis shelf and plugged everything into that, so I would only have one cord leaving the cabinet. A WI-FI card was used for the network connection, and a wireless keyboard and mouse was added, so that only only the power cord came out of the back of the TV. As a final touch, I mounted an amber LED at the bottom of the cabinet where the old power lamp used to be, and drove it off the Power LED connection on the motherboard. I tracked down old Indian Head test pattern for the desktop wallpaper, and it was done. The kids have watched countless movies and hours of TV on the set via the SlingBox, and an old, broken TV was given a new life.


I hope this project inspires others to take the plunge and put computers in other unexpected places. If you do, post a comment or send me an email to let me know about it.

Read More......

20080426

Ubuntu 8.04 Hardy Heron Synergy Client Setup

In the Teknynja cave I have a MS Windows XP box with two monitors (my main development system) and a Ubuntu box with one monitor (my Internet offload system). I use Synergy to control the Ubuntu system using XP's mouse and keyboard. Since the Ubuntu box doesn't have a keyboard or mouse connected to it, a little hacking is required to get the Synergy client running before the login screen. I've been doing this with my Ubuntu 7.04 system for a while, and now that I am setting up a replacement Ubuntu 8.04 system, I thought I would document the Synergy client setup for future reference. It should be noted that I installed Ubuntu Hardy Heron from the Alternate CD, but that should not make a difference for this procedure. I also assume that you already have the Synergy keyboard/mouse server configured and running somewhere on your network.

First, install Synergy on the Ubuntu system using:

sudo apt-get install synergy

Then edit the gdm initialization file:

sudo nano /etc/gdm/Init/Default

and add the following lines just before the “sysresources=/etc/X11/Xresources” line

/usr/bin/killall synergyc
sleep 1
/usr/bin/synergyc xxx.xxx.xxx.xxx

where xxx.xxx.xxx.xxx is the IP address of your server machine.

Now edit the gdm pre-session file:

sudo nano /etc/gdm/PreSession/Default

and and the following line just before the “XSETROOT='gdmwhich xsetroot'” line

/usr/bin/synergyc xxx.xxx.xxx.xxx

Make sure the Synergy server is configured and running on your keyboard/mouse system, and reboot the Ubuntu system. You should now be able to move the mouse over to the Ubuntu screen and login normally.


Note that I still consider myself a Ubuntu/Linux noob, and so any improvements/comments/suggestions you have about this post are greatly appreciated. Ymmv. Most of the help I needed setting up this configuration came from the Ubuntu Synergy How To page.

Read More......
 
Template design by Amanda @ Blogger Buster